Customer's Guide
  • Quick Start with Plesk
    • Log In to Plesk
    • Overview of Plesk Interface
    • Set Up Your First Website
      • 1. Create Your Site
        • Presence Builder
        • Content Management Systems
        • Uploading Content
      • 2. Preview Your Site
      • 3. Submit Your Sites to Search Engines
    • Set Up Mail Accounts
      • 1. Create Mail Account
      • 2. Access Your Mailbox
        • Access from Webmail
        • Access from Microsoft Office Outlook 2019
        • Access from Microsoft Office Outlook 2016
        • Access from Windows Live Mail
        • Access from Mozilla Thunderbird
        • Access from Apple Mail
        • Access from iPhone
        • Access from Gmail on Android
    • View Site Visit Statistics
  • Customer Account Administration
    • Changing Your Password and Contact Information
    • Viewing Subscription Summary
      • Allocated and Consumed Resources
      • Hosting Features Available for Your Websites
      • Permissions Available for Your Website
    • Viewing Statistics
      • Log Files
      • Tracing Failed Requests (Windows)
    • Managing Additional User Accounts
    • Creating Custom Buttons
  • Websites and Domains
    • Domains and DNS
      • Adding and Removing Domains
      • Adding Subdomains
      • Adding Domain Aliases
      • Adding Wildcard Subdomains (Linux)
      • Adding a Domain Forwarder
      • Configuring DNS for a Domain
        • Plesk as a Master DNS Server
        • Plesk as a Slave DNS Server
        • Disabling the Plesk DNS Service
        • Registrar’s DNS Settings in Plesk
        • Configuring DNS via Domain Connect
      • Configuring DNSSEC for a Domain
    • Hosting Settings
      • General Settings
        • Hosting Types
        • Website Status
      • Web Scripting Settings
        • PHP Settings
        • PHP Handler Types
        • ASP.NET Settings (Windows)
      • Web Server Settings
        • Apache and Nginx Settings
        • IIS Web Server Settings
    • Website Content
      • Presence Builder
      • Content Management Systems
      • Uploading Content Using FTP
      • Uploading Content with File Manager
      • Changing File and Directory Access Permissions in File Manager
      • Deploying Content Using Git
    • Restricting Access to Content
    • Site Descriptions
    • Previewing Websites
    • Web Applications
    • Viewing Website Error Log
    • Securing Connections with SSL/TLS Certificates
      • Securing Connections with the SSL It! Extension
      • Protecting Webmail and Mail with SSL/TLS Certificates
      • Protecting Your Website With an SSL/TLS Certificate
      • Getting Free SSL/TLS Certificate from Let’s Encrypt
      • Purchasing an SSL/TLS Certificate via Plesk
      • Purchasing an SSL/TLS Certificate From a Certificate Authority
      • Protecting Your Website With a Self-Signed SSL/TLS Certificate
    • Protecting Sites from Hotlinking (Windows)
    • Extended Website Management
      • Working with a Staging Site
      • Setting Up Custom Error Pages
        • Setting Up Custom Error Pages on Windows Servers
        • Setting Up Custom Error Pages on Linux Servers
      • Hosting Personal Web Pages Under Your Domains
      • (Plesk for Windows) Limiting Bandwidth and Number of Connections to Websites
      • Using Virtual Directories (Windows)
        • Creating Virtual Directories
        • Configuring ASP.NET for Virtual Directories
        • Configuring PHP for Virtual Directories
        • Setting Up Access to Virtual Directories
        • Changing Virtual Directory Settings
        • Adding and Removing MIME Types
      • Setting Up IIS Application Pool (Windows)
      • Web Publishing with Web Deploy (Windows)
  • Git Support
    • Using a Local Repository
    • Using remote Git hosting
  • Ruby Support (Linux)
    • Manage Ruby Applications
    • Manage Ruby Versions via CLI
    • Run Rake tasks
  • WordPress Toolkit
  • Node.js Support
  • Creating Websites with Presence Builder
    • Getting Familiar With Presence Builder
    • Creating a Website
    • Importing Sites from SiteBuilder 4.5
    • Editing Websites
      • Structure: Pages and Navigation
        • Adding and Removing Pages
        • Adding and Removing Navigation Links
      • Design: Design Templates, Layout, Styles, Color Scheme, and Header
        • Selecting a Website Design Template
        • Changing Your Website Layout
        • Selecting Website Colors, Background Images, Fonts, and Styles for Borders and Corners
        • Changing the Website Header Elements
      • Content: Text, Tables, Images, Video, Forms, and Scripts
        • Text, Tables, Hyperlinks, Flash Files, and Images
          • Hyperlinks, Links to Email Addresses, and Anchors
          • Creating Links to Other Pages
          • Creating Links to Different Sections of a Webpage
          • Creating Links to Email Addresses
        • Image Gallery
        • Image Slider
        • Embedded Video
        • Contact Form
        • Blog
        • Commenting
        • Documents and Other Downloadable Files
        • Buttons for Sharing on Social Networks
        • Site Search
        • Online Store
        • Map
        • (Advanced) Custom Scripts
        • Advertisements
        • Twitter Feed
        • Amazon aStore
      • Multi-Language Websites
      • Settings and Tools for Webmasters
    • Saving and Loading Copies of a Website
    • Optimizing Sites for Mobile Devices
    • Publishing a Website to the Internet
    • Publishing a Website Copy to Facebook
    • Viewing Site Visits Statistics, Comments, and New Orders on the Dashboard
    • Deleting Websites
  • FTP Access to Your Websites
    • Changing FTP Access Credentials
    • Adding FTP Accounts
    • Setting Up Anonymous FTP Access
  • Mail Settings
    • Mail Settings of Domains
    • Adding Mail Accounts
    • Changing Mail Account Password
    • Setting Up Mail Forwarding
    • Creating Mail Aliases
    • Setting Up Auto-Reply
    • Protecting from Spam
    • Protecting from Viruses
    • Enabling DKIM Email Signing
    • Checking Disk Usage by Mailboxes
    • Changing Mailbox Size
    • Additional Services
    • Limiting Outgoing Mail
    • Using External Mail Servers (such as Gmail)
    • Using Mailing Lists (Windows)
  • Scheduling Tasks
  • Website Databases
    • Creating Databases
    • Accessing Databases
    • Viewing Connection Information
    • Copying Databases
    • Backing Up and Restoring Databases
    • Exporting and Importing Database Dumps
    • Managing Database User Accounts
    • Setting Up Custom Access Rules
    • Checking and Repairing Databases
    • Post-Restoration Database Repair (Windows)
    • Accessing Databases with ODBC (Windows)
    • Accessing Databases with Connection Strings
  • Backing Up and Restoring Websites
    • Creating Backups
    • Restoring Backups
    • Configuring Remote Storage
    • Uploading, Downloading, and Removing Backups
Customer's Guide
  • Docs »
  • Creating Websites with Presence Builder »
  • Editing Websites »
  • Content: Text, Tables, Images, Video, Forms, and Scripts »
  • Text, Tables, Hyperlinks, Flash Files, and Images

Text, Tables, Hyperlinks, Flash Files, and Images

Before you start working on website content, we suggest that you select the appropriate website language in Settings tab > Languages > Website language menu.

The website language is a site-wide setting that defines the language in which you will be adding content to your website. It affects the following:

  • The language in which certain website elements (in particular those provided by third-party services), such as Google Search and navigation buttons in image galleries, will be shown. Note that not all third-party services and modules provided by the editor support all available languages.
  • The direction in which you will type text in the editor (from left to right or from right to left). If you select a right-to-left language, your website content and design will be RTL-enabled.

Note

Changing a website language does not reload the currently selected website topic in a different language. The topic language will remain unchanged, however, the text orientation will change.

To add text, lists, tables, or images to a page:

  1. Go to the Modules tab, select Text & Images, and drag the module to the page.
  2. Type the text on the screen and use the icons on the module’s toolbar to format the text, add tables, hyperlinks, and images.

The toolbar and panels of the Text & Images module provide access to the following tools and functions.
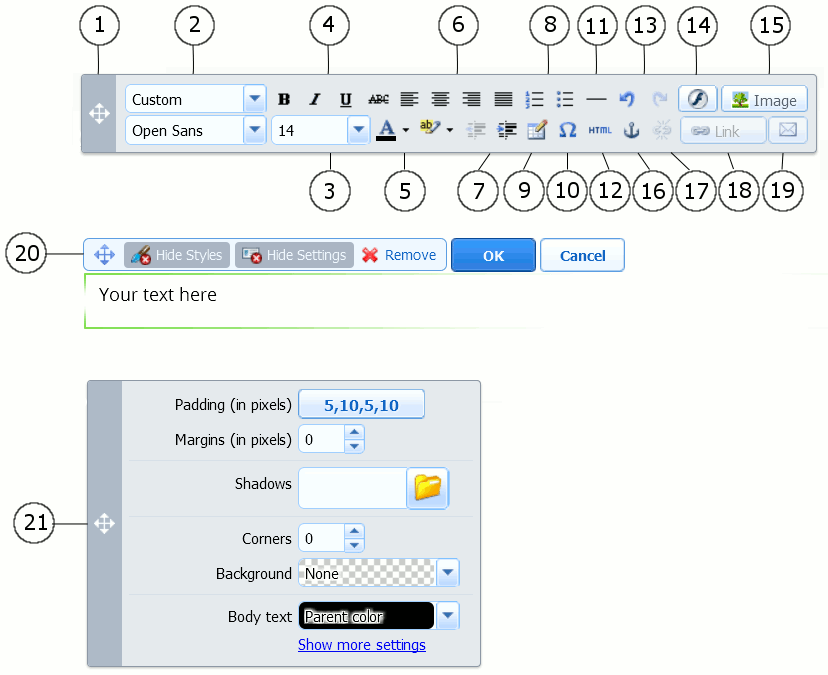
image-73486.png

  1. Move the toolbar.

  2. Select the paragraph style and font face. Note that the Terminal font is not supported by Google Chrome.

  3. Select the font size.

  4. Select the font style: bold, italics, underlined, and strikethrough.

  5. Select the text and background colors.

  6. Select text alignment: left, center, right, or justified (aligned to both the left and right margins with added extra spaces between words).

  7. Increase and decrease the indent level of the paragraph.

  8. Start a numbered or bulleted list.

  9. Insert a table and specify the number of rows and columns.

    After you insert a table, a number of additional icons become accessible from the toolbar. Use them to change the properties of the table rows and cells, to insert and remove rows and columns, or to split and merge table cells.

  10. Insert symbols that are not on your keyboard, such as copyright and trade mark signs, and other Unicode symbols.

  11. Insert a horizontal line.

  12. Edit the HTML source code of the page.

  13. Undo and redo changes.

  14. Insert a Flash object in the SWF format.

  15. Insert an image, adjust its size, specify a description, and text wrapping.

    You can choose to show the description below the image, show it over the image only when users hover the mouse pointer over it, or to not show it. The description also serves as alternative text: In browsers that do not support or are configured to not show images, the description will be shown instead.

    If you want to insert many pictures into a single page, consider using the Image Gallery module instead of the Text & Images module. With Image Gallery, you can upload pictures from your local computer. To learn more about the Image Gallery module, see the section Image Gallery.

    If you want to add a slide show with multiple images, use the Image Slider module. To learn more about the Image Slider module, see the section Image Slider.

  16. Insert HTML anchors into particular sections of webpages so that you can link to them from the same or other pages of your site.

  17. Remove hyperlinks from selected text.

  18. Add hyperlinks to pages of your website or external resources.

  19. Add a link to an email address.

    To learn more about adding hyperlinks, see the section Hyperlinks, Links to Email Addresses, and Anchors.

  20. Move the text and image block within the webpage, remove the block with its contents, save changes, cancel the changes made.

  21. Move the styles panel, specify the style of elements in the text and images block.


© Copyright Plesk

Built with Sphinx using a theme provided by Read the Docs.